Cookie Consent Manager Configuration
Cookie Consent Manager Configuration
OverviewUnder privacy regulations, businesses are required to provide users with cookie banners to exercise their rights and set their preferences. Under the GDPR, users have the option to opt-in to the collection, storage, processing and sale of their data. Other regulations outside the EU allow users to exercise their right to opt-out of the above processes.
This guide covers all the steps involved in configuring and managing your cookie consent banner, through which users can exercise their privacy rights, and managing your cookie settings.
Steps:
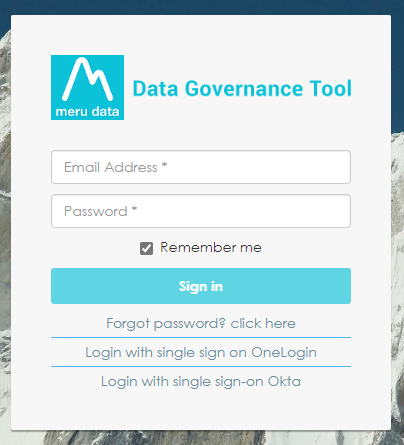
Sign into your Data Governance Tool account
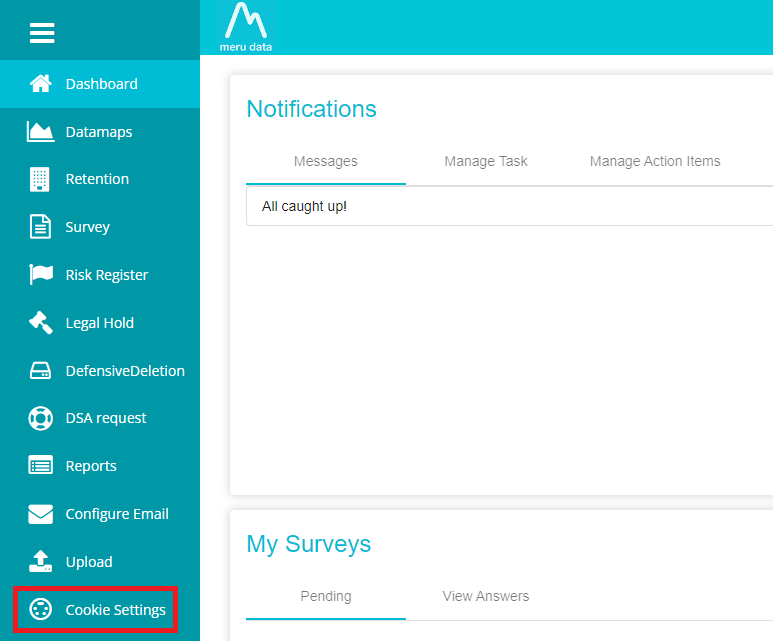
From the Main Screen of Data Governance Tool, click on Cookie Settings, present on the hamburger menu on the left of the screen.
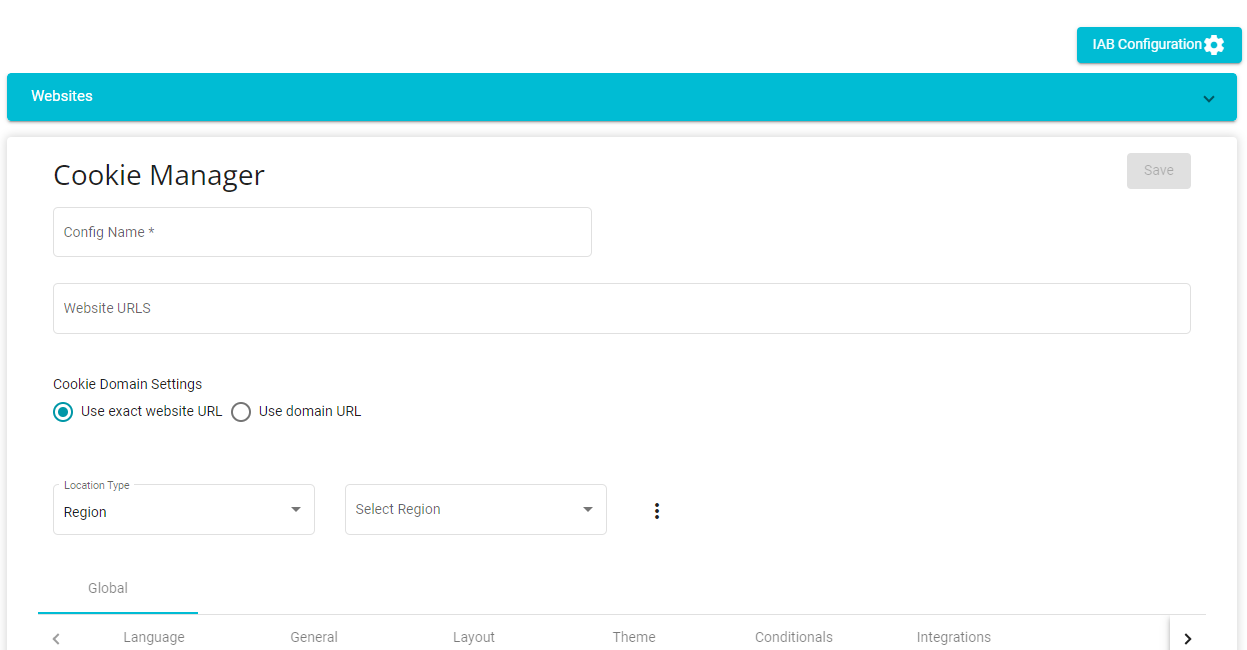
The Cookie Consent Configuration Page will now be opened
How to configure a new Cookie Banner
Note: The steps to configure your IAB compliant cookie banner can be found below
Enter the configuration name and provide the website URL to which the cookie banner will be added.
Here you can add multiple URLs. There is no limit on the number of URLs that can be added. The main domain URLs and sub domain URLs can be added here, as well as the URLs of different domains. By doing this, the cookie banner configured here be available for all URLs provided.
The cookie banner will be available only for those websites which have the Meru script embedded in them.
Once you type in the URL, press enter to validate the website. If the website URL provided is legitimate, it will be highlighted in green as shown below.
If the website provided is invalid, the following message will be displayed on the bottom of the screen.
If the website provided is unavailable, or inaccessible, the URL chip will be displayed in yellow colour.
Uncheck the tick mark next to Activate or Deactivate the cookie banner as needed.
Next, select the Cookie Domain Settings of your choice
Use exact website URL: This option requires users to provide consent/set their preferences for each the above websites separately.
Use domain URL: Consent/ preferences given via the banner on one website will be applicable to all sub domains provided here. In other words, if a user denies consent on one website, cookies consent will remain denied on other websites as well.
Next, from the Location Type drop-down, select the location to which the cookie banner will be applicable.
Here there are 3 options. Depending on the selection made here, users will then have to select the name of Country/Region/State of their choice.
This choice is made based on the location of end-users/website visitors using the website. If the primary customer base is in, for example, the state of California, then the user will create a cookie consent configuration for end-users from California.
Different configurations are made for end-users from different locations to cater to the different laws and requirements of various locations.
Press on
and click Add New Location to create cookie configurations for multiple locations
In this manner, the user can create different cookie configurations catering to end-users from different locations around the globe.
If Region is selected here, then, from the drop-down menu that appears, the user will have to select the specific region, as shown in the example below
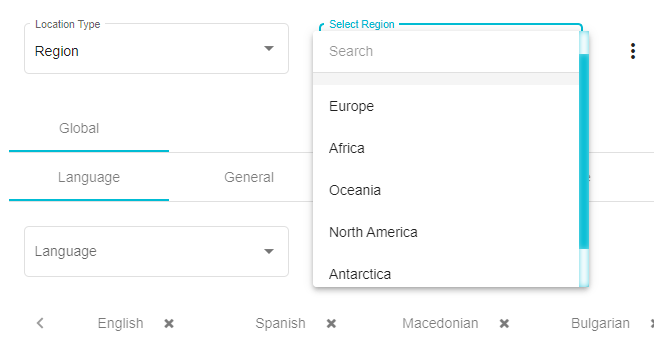
If State is selected under Location type, then user will have to select the State as per their requirements
Note: If user has created multiple configurations for different locations, such as, for example, for Europe, for United States and for Texas, as shown below
Then, a hierarchy is followed to select from among these configurations, which will be displayed to the end-user depending on their location.
If, for example, the end-user is visiting the website from Ohio, then it is checked whether there is an existing configuration for the State, here, Ohio. In this case, say there isn't a configuration for Ohio. Next, it is checked whether there is an existing configuration for the country. In this case, there is an existing configuration for the United States and hence that cookie consent configuration is provided to the end-user.
If there was no configuration on a Country level, then a Region level configuration is searched for. If there is no configuration on a Region level, then the default configuration - Global is provided to the consumer. The Global configuration can be customized.
Once satisfied with your input, click the Save button to save the configuration. Saving the configuration does not publish the cookie banner.
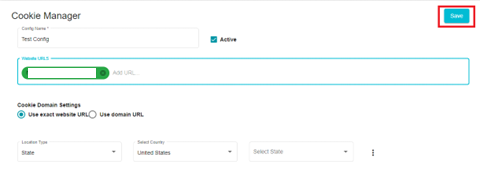
On clicking the Save button, two additional buttons will appear.
Click Update to update the existing configuration. Click Publish to see the configuration live i.e., the cookie banner will now be present on the website.
Note: Clicking Update will only update any existing configuration. To see the changes live, ensure to click Publish

The configuration script will be copied to the user's clipboard by clicking on the Configuration Script button.
Embed this script into the domains and sub domains where you want the cookie consent configuration to be available. Only by embedding this script into your domains, will the cookie banner be available on your website.
If the configuration has been previously published, the date that it was Last Published will be visible here.
How to configure, customize and update your cookie settings
Create a new Configuration by clicking New or select the existing Configuration to which you wish to make changes.
The existing configurations are available on the Menu on the left of the screen.
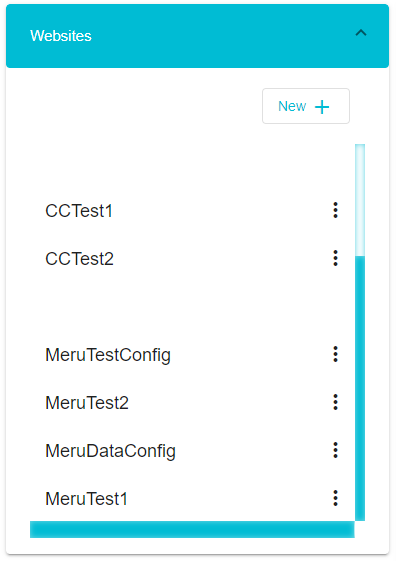
Click on the title to open and make changes to that configuration.
Language Configuration
Under the language drop-down, select the language that the cookie banner is to be displayed in.
You can choose to add banners in multiple languages by clicking the Add button present on the three dot Menu.
Clicking Add new language will insert a new Language configuration page wherein the banner can be configured to be displayed in the language of your choosing. In the below example, the two languages chosen are English and German, meaning you will have two language configurations, or your cookie banner can be displayed in either of the 2 languages depending on default language of the website visitor.
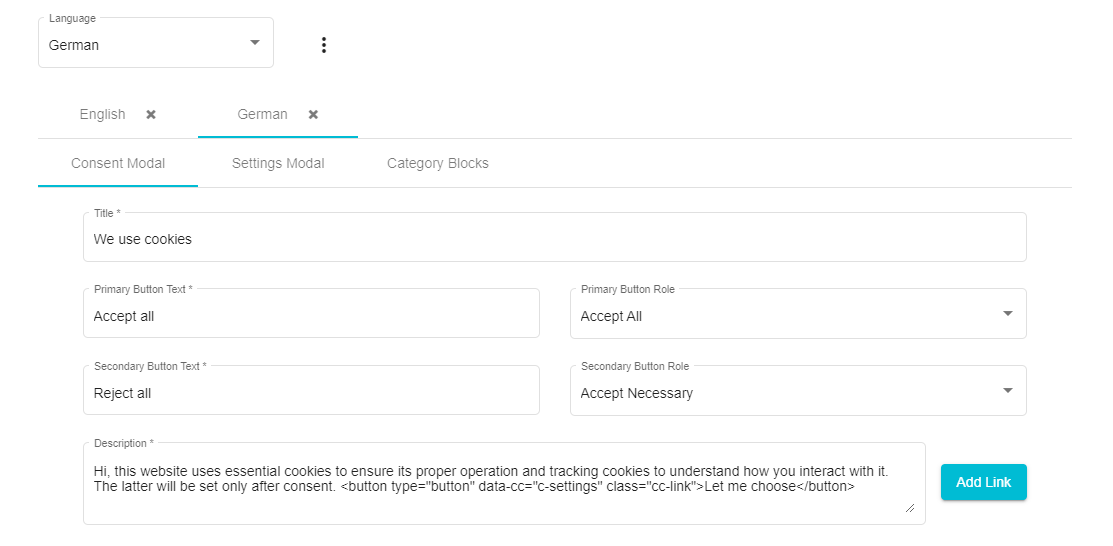
Language Configuration - Consent Modal
The Consent Modal is the first cookie banner that users see on the company website. An example of the Consent Modal is presented below.

Here you can configure the Consent Modal

Title: Here you can define the title of the cookie banner. In the above example, the title of the banner is We use cookies
Primary Text Button: Here you can define the title of the primary text button. In the above example, the primary text button is Accept All
Primary Button Role: Here you can define the function of the Primary Text Button from the 3 options available.
Cookie Settings: If the Cookie Settings option is selected, then on clicking the Primary Text button, the user will be directed to the Cookie Settings.
Accept All: If the Accept All option is selected, then on clicking the Primary Text button, all cookies will get accepted automatically
Accept Necessary: If the Accept Necessary option is selected, then on clicking the Primary Text button, only the necessary cookies will get accepted.
Secondary Text Button: Here you can define the title of the secondary text button. In the above example, the secondary text button is Reject All
Secondary Button Role: Here you can define the function of the Secondary Text Button from the 3 options available.
Cookie Settings: If the Cookie Settings option is selected, then on clicking the Secondary Text button, the user will be directed to the Cookie Settings.
Accept All: If the Accept All option is selected, then on clicking the Secondary Text button, all cookies will get accepted automatically
Accept Necessary: If the Accept Necessary option is selected, then on clicking the Secondary Text button, only necessary cookies only will get accepted.
The Description field allows you to provide information about the cookie settings to the users. Links and buttons can be added to the description.
Language Configuration - Settings Modal
The Setting Modal can also be considered the Cookie Settings Banner. It is the banner that users are presented with when they wish to learn more about cookies about set their preferences. An example of how the Settings Modal would look on a website is presented below.
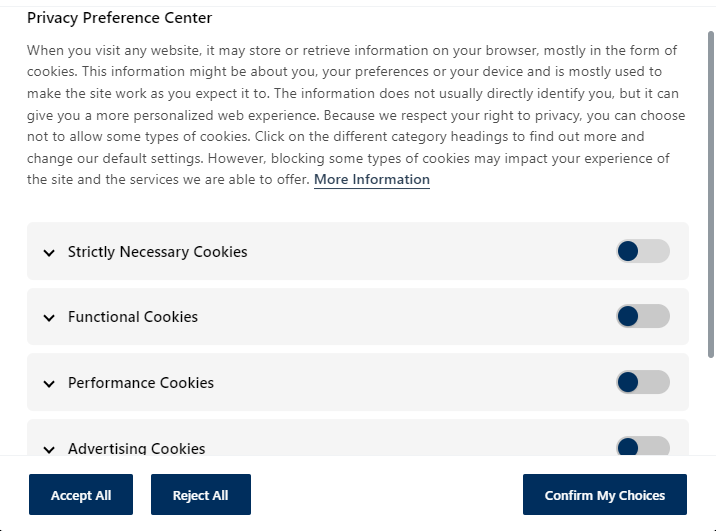
Here you can configure the Settings Modal

Logo URL: Add the Logo of the company via the URL here.
Save Settings Button Text: Here you can define the title/wording of the Save Settings button. In the above example, 'Confirm My Choices' is the title given to the Save Settings Text Button
Accept All Button Text: Here you can define the title/wording of the Accept All button.
Reject All Button Text: Here you can define the title/wording of the Reject All button.
Language Configuration - Category Blocks
Category Blocks are a part of the Settings Modal that explain the different categories of cookies collected and enable users to set their preferences for each category. An example of the Category Blocks is presented below
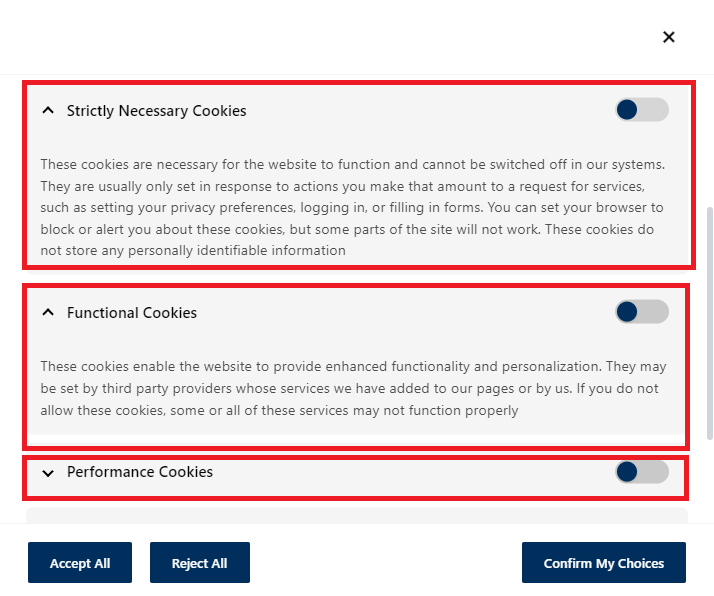
Here you can configure the Category Blocks of the Settings Modal
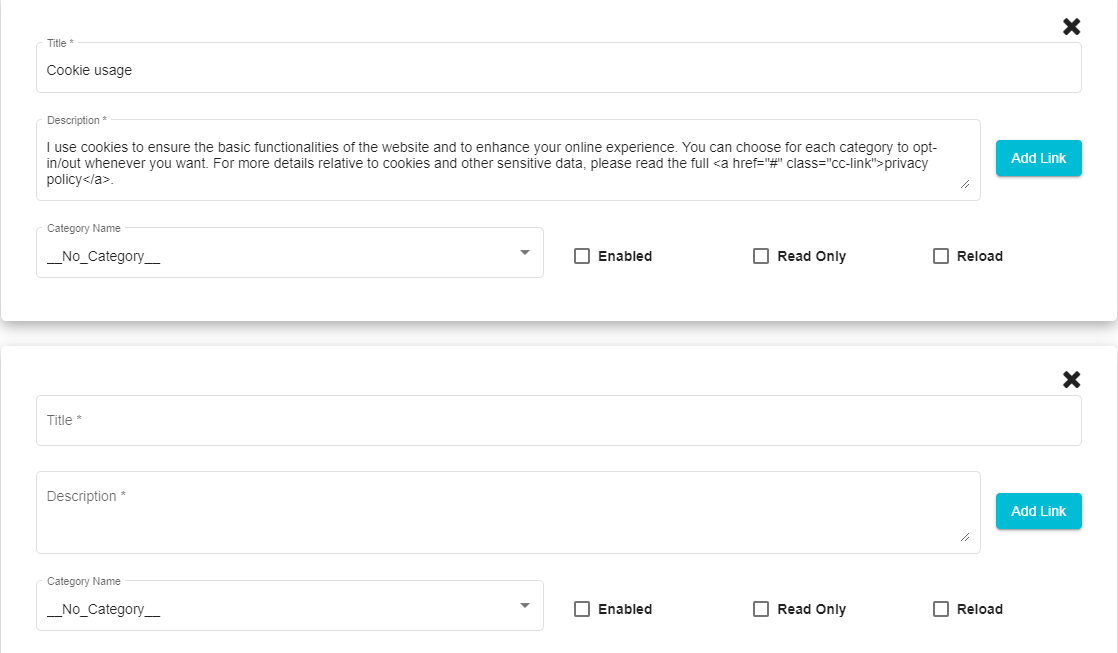
Title: Here you can define the title of the cookie category
Description: Use the description field to provide more information about each category. Links can be added to the description as well using the Add Link button.
Category Name: From the drop-down menu, select the category/type of the Cookie. If the user enables this cookie category, it will act according to the selection made here.
For example, some functions of the website may not work if the user disables the necessary cookies category.
Note: A block can be defined as No Category in which case it will not operate according to the predefined functions of any blocks.
Enabled: The Cookie Category will be pre-enabled if the Enabled box is checked.
Read Only: The Cookie Category cannot be disabled if the Read Only box is checked.
Reload: Certain functions like clearing cookies require the page to be reloaded. This function can be enabled here.
Click
to add more Category Blocks.
General Configuration
This panel provides you with certain general cookie settings.

Cookie Name: The users consent choices (whether they accepted or rejected cookies and which cookies they accepted and rejected) are saved under this cookie. Here you can provide a title for this cookie.
Cookie Domain: The domain on which the cookie is set, or the domain to which the cookie belongs. The domain can be a specific domain name (e.g., \"example.com\") or a more specific subdomain (e.g., \"subdomain.example.com\").
Cookie Expiration: The cookie expiration is duration for which a cookie remains valid on a user\'s device. The expiration date of the user consent choice cookie can be defined here.
For example, if the expiration is set to 20 days, then after 20 days, the banner will appear for the user to set their preferences again.
Default Language: This drop-down displays the list of languages that have been included in this cookie configuration (as defined in the Language panel). Here you can set the language of the cookie banner that will get picked in case the users default browser language does not match any language that has been included under this configuration.
Delay: Here you can determine the waiting time (in seconds) before the consent modal is displayed
Use RFC Cookie: Check this box to save the users consent preferences according to RFC standards. In other words, users preferences will be encoded and stored instead of storing it as plain text.
Auto Language: Checking the Auto Language box will ensure that the cookie banner language matches the default browser language that the user has set.
If the cookie configuration does not include the default language that has been set by the user on his/her browser settings, then the cookie banner will be presented in the default language chosen above.
Hide Cookie tables: Check this box if you wish to remove the Cookie tables from the Cookie blocks. (The headings of these tables have been defined under the Settings Modal)
Force Consent: Checking the Force Consent box disallows the user to proceed on the website without making a cookie choice. In other words, the user has to either accept, reject, or set their cookie preferences in order to access the website.
IABTCF Complaint 2.2: Check this box to integrate the IAB compliant cookie banner section into your cookie banner. On checking this box, two additional drop-down boxes will appear. More information on configuring an IAB compliant cookie banner is given below.
Layout:
Here you can design the layout of the consent banner
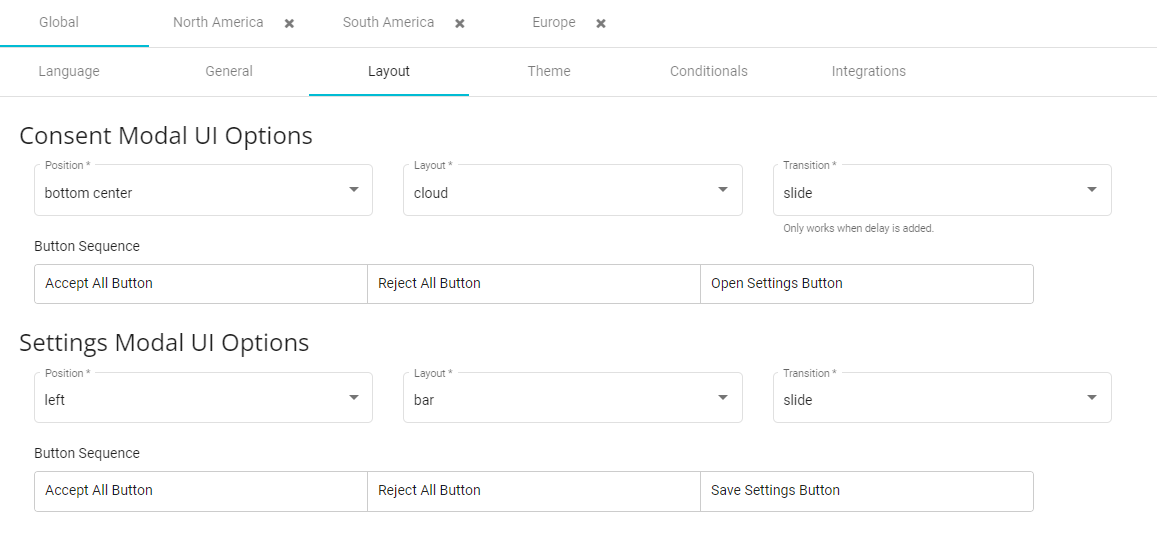
Consent Modal UI Options
Position: From the drop-down menu you can select the position of the cookie banner/Consent Modal on the website.
Layout: From the drop-down menu you can select the format in which the Consent Modal should be presented (Box, Bar or Cloud)
Transition: Here you can select the animation of the Consent Modal; the way in which it will appear.
Button Sequence: Here you can move and alter the order of the Consent Modal buttons. Drag and drop the buttons according to your requirements.
Settings Modal
Position: From the drop-down menu you can select the position of the Settings Modal on the website.
Layout: From the drop-down menu you can select the format in which the Settings Modal should be presented (box, bar)
Transition: Here you can select the animation of the Settings Modal; the way in which it will appear.
Button Sequence: Here you can move and alter the order of the Settings Modal buttons. Drag and drop the buttons according to your requirements.

Theme
Use this Panel to customize the theme and colours of your Modals
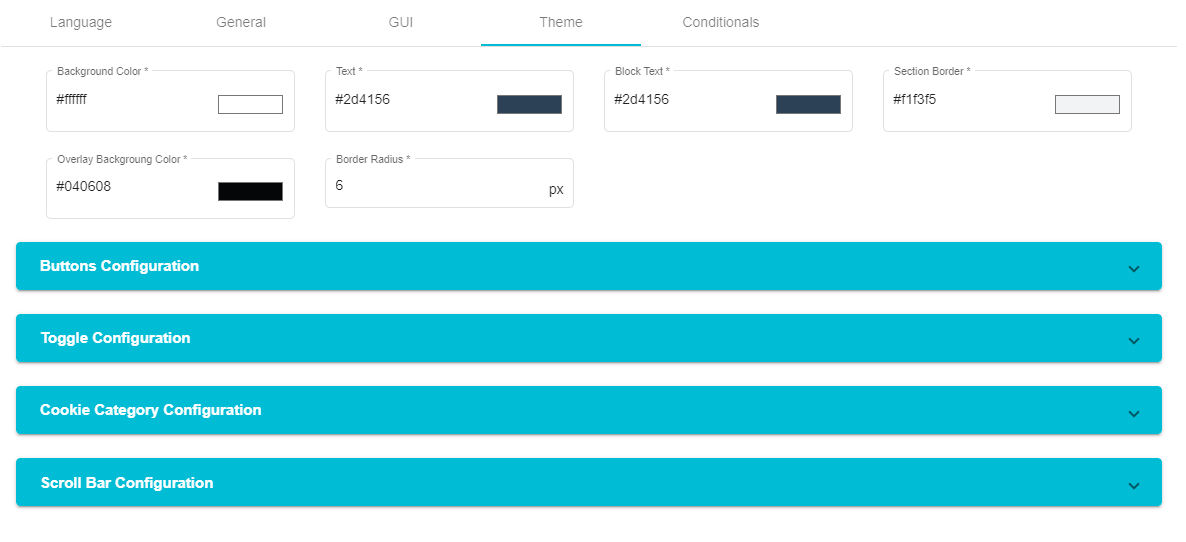
Background Colour: Here you can define the background colour of the Settings Modal.
Text: Here you can define the colour of the text used in the Settings Modal
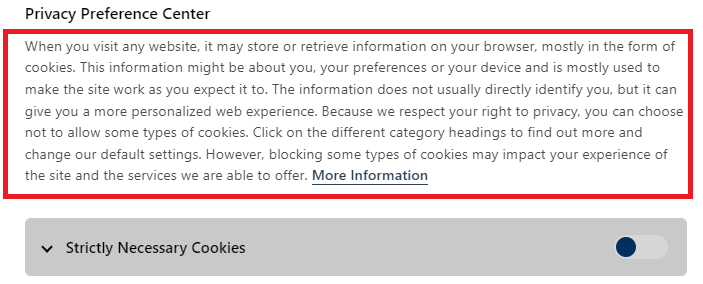
Block Text: Here you can define the colour of the text present inside the blocks.
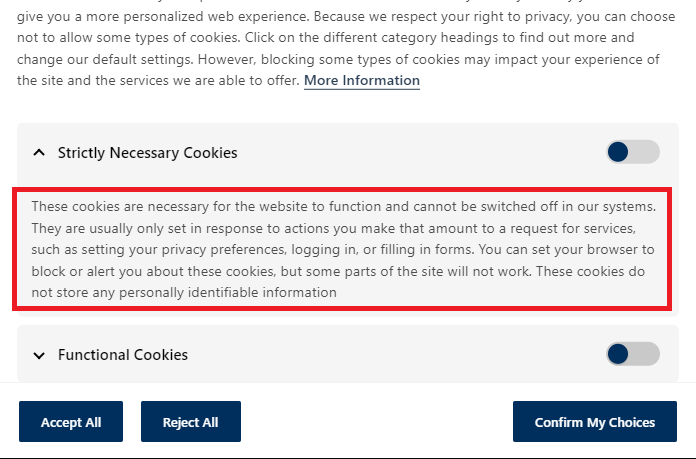
Section Border: Here you can define the colour of the section on which the block heading is present.
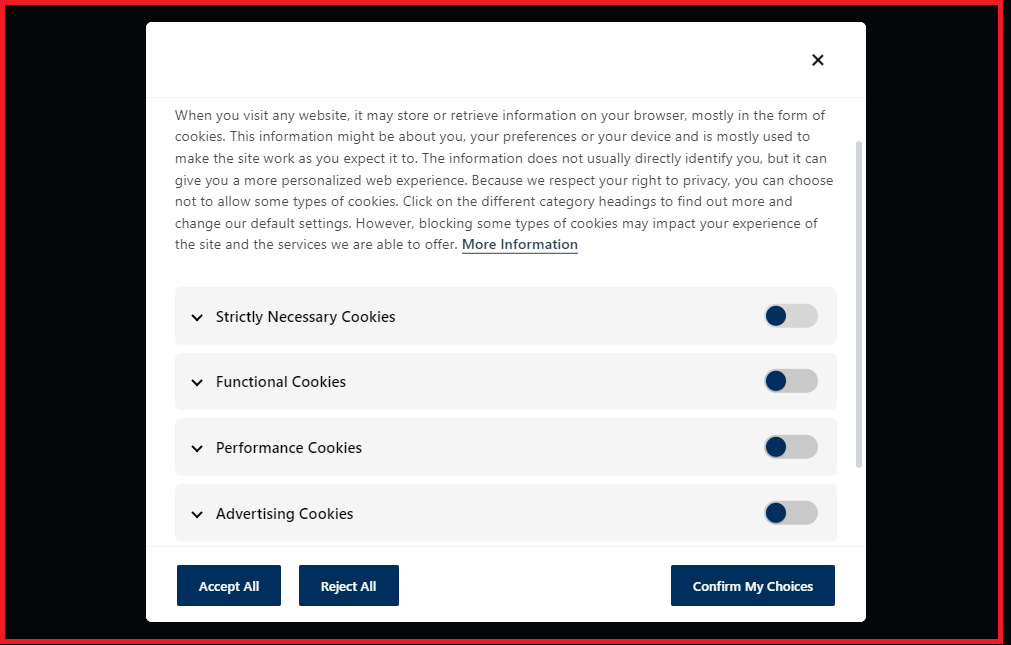
Overlay Background Colour: Here you can define the colour present behind the Settings Modal. In the below example, the overlay background colour is set to black.
Border Radius: Here you can define the curvature of the banner and panel borders
Buttons Configuration
Here you can customize the buttons present on the Settings Modal

Button Primary Background: Here you can set the background colour of the primary button. In the below example, the background of the Primary Button is blue
Button Primary Text: Here you can set the colour of the primary button text. In the example, the text colour of the primary button is white.
Button Primary Hover Background: Here you can set the colour that the primary button will turn when the mouse hovers over it.
Button Secondary Background: Here you can set the background colour of the secondary button. In the below example, the background of the secondary button is blue.
Button Secondary Text: Here you can set the colour of the secondary button text. In the example, the text colour of the secondary button is white.
Button Secondary Hover Background: Here you can set the colour that the secondary button will turn to when the mouse hovers over it.
Button Radius: Here you can define the curvature of the buttons.
Button Link: The colour of button links can be defined here. An example of a button link is given below.
Toggle Configuration
Here you can customize the toggles present on the Settings Modal. An
example of a toggle is provided here
Toggle Background Off: Here you can set the colour of the toggle if it is switched off.
Here the toggle has been switched off.
Toggle Background On: Here you can set the colour of the toggle if it is switched on.
Here the toggle has been switched on.
Toggle Knob Background: Here you can set the colour of the toggle knob.
Toggle Knob Background Icon: Here you can set the colour of the toggle knob background icon.
Toggle Background Read-only: Here you can set the colour of the toggle if it has been set to Read only.
Cookie Category Configuration
Here you can customize the colours of the Cookie Category blocks.
Cookie Category Block Background: Here you can set the colour of the block background. In the example provided, the block background has been set to pink
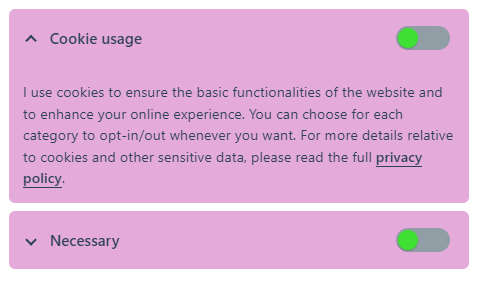
Cookie Table Border: Here you can set the colour of the Cookie Table Border.
Cookie Category Block Background Hover: Here you can define the colour that the block will turn to when the mouse hovers over it.
Scroll Bar Configuration
Here you can customize the colours of the scroll bar
Scroll Bar Background: Here you can set the colour of the scroll bar.
Scroll Bar Background Hover: Here you can set the colour that the scroll bar will turn to when the mouse hovers over it.
Conditionals
Here you can set conditions that consider the pre-existing flags i.e., Global Privacy Control (GPC) and Do Not Track (DNT) enabled on a user\'s browser. These flags, when enabled, block all cookies except the necessary ones.
This feature is used in the scenario that the end users have either GPC or DNT enabled on their browser. Here, we consider that these flags have been enabled and hence the same will be reflected on the Settings Modal of their cookie banner, based on the configuration made here.
Click on
present on the Conditionals panel.
A Configuration box will appear
From the Label drop-down, select either GPC or DNT (or both as end users could have either of the two enabled)
Next, switch the Toggle on. This means that if GPC has been enabled by the end-user, then this configuration will apply.
From the Opt-in drop down, select the cookie categories that you want opted in (these categories will be opted in despite the GPC being enabled and the same will be reflected on their Settings Modal; they will be pre-selected to opt-in. However, the user can opt-out if they want to)
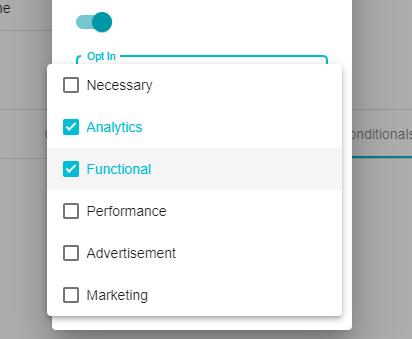
In a similar way, select the cookie categories to be opted out (these categories will be opted out and the same will be reflected on their Settings Modal; they will be pre-selected to opt-out. However, they can opt-in if they want to)
Click Save to add the conditional.
Nested conditions can also be added. Meaning that we can configure the conditionals in scenarios wherein GPC has been turned on and DNT has been turned on, or when DNT has been turned on and GPC has been turned off and so forth. To do this, click the Add button against the saved conditional and add the nested condition.
Integrations
We integrate with Google Tag Manager and here you can manage the consent signals from the user to be sent to them.
For example, if a user chooses to opt-out of Analytics cookies on the cookie banner, and the Analytics Cookie Category has been placed against the analytics_storage consent type here, then a signal will be sent to Google Tag Manager communicating that the user has opt-outed of analytics cookies and hence that data should not be collected and stored by them.
Click on the Gtag drop-down
Next, map the consent type to the appropriate cookie category. For example, the Analytics cookie category can be mapped to the analytics_storage consent type. This means that when the user accepts analytics cookies on their cookie banner, the dataLayer shows that analytics_storage is granted. In other words, consent to collect data for analytics purposes is granted and this consent is visible. Google Tag Manager sees this data and acts accordingly.
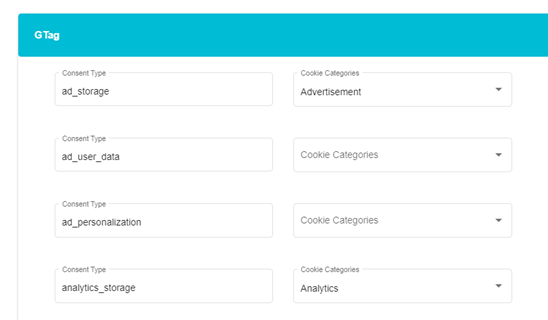
The consent types - ad_storage, ad_user_data and ad_personalization can be mapped to the Advertisement category. If either of these categories are left unmapped, they will automatically get mapped to the Advertisement category if Advertisement has been mapped to ad_storage.
In the image above, Advertisement has been mapped to ad_storage, but ad_user_data and ad_personalization are not mapped to any cookie category. In this case, they will automatically get mapped to Advertisement.
This means that if the user accepts Advertisement cookies on the cookie banner, then ad_user_data and ad_personalization are also granted.
Note 1: If a consent type is not mapped to any cookie category, and that cookie category block has been enabled, then this cookie category will remain denied even if the user accepts it.
For example, as shown below, the analytics_storage consent type has not been mapped to any cookie category.
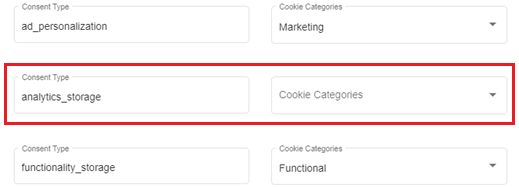
But this cookie category block has been enabled (Language > Category Blocks > Analytics > Enabled)
Now, say the user accepts analytics cookies
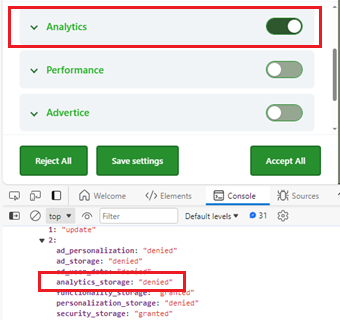
analytics_storage will be denied in the backend as no cookie category was mapped to it as seen in the above image.
Note 2: If a consent type has been mapped to a cookie category, but the enable button has not been checked for that cookie category block, then that cookie will be denied until the user chooses otherwise.
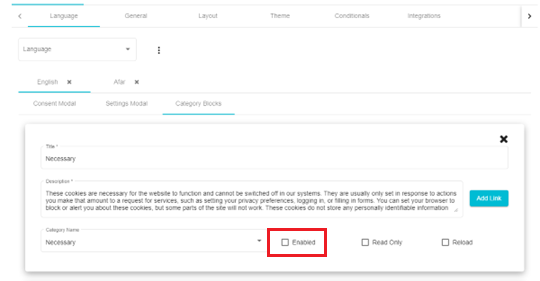
Note 3: Security storage will always remain granted by default
IAB Cookie Banner Configuration
As of 2024, if the consent management platform on your website is not certified by Google, then certain functions, powered by Google, will not work. For example, AdSense cannot place ads on the website. However, to be certified by Google, the consent management platform must first be certified by the Interactive Advertising Bureau (IAB). To be certified by IAB, your consent management platform should be compliant with the technical specifications provided by them and should adhere to their standards. IAB certifies both consent management platforms and vendors.
Some of the key IAB specifications mandate that:
The cookie banner should clearly disclose all information about the associated vendors.
Choice to exercise (and update) consent should be available for each purpose and special feature.
An API should be exposed in the browser that communicates to vendors whether they can place cookies on the user's browser or not.
An example of an IAB compliant cookie banner is show below
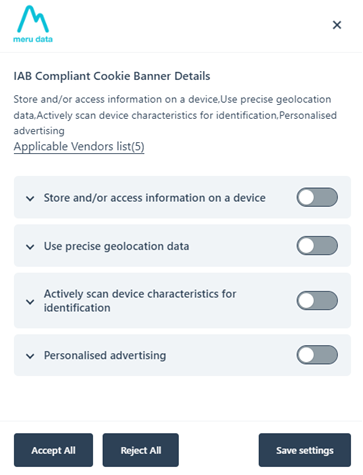
To configure an IAB compliant cookie banner, follow these steps:
On the cookie consent configuration page, click on the IAB Configuration button the top right of the screen
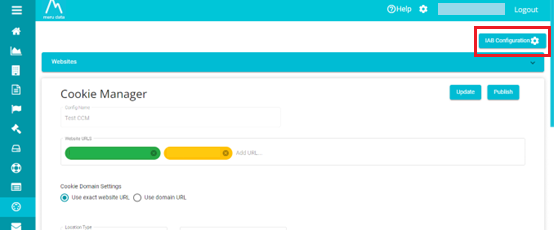
The IAB Configuration page will open
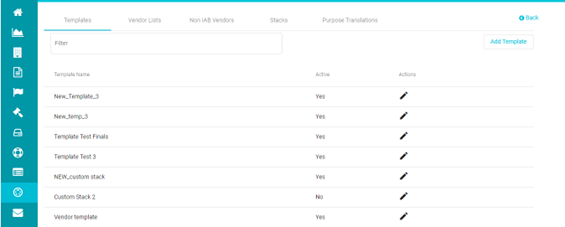
The IAB Configuration page has the following sections: Templates, Vendor Lists, Non IAB Vendors, Stacks and Purpose Translations. Let's look at each of them in detail
Templates
On this page, you can create a new IAB compliant cookie banner template or select an existing one. Edits and updates to existing templates can also be made from this section.
In this section, you can utilize the configurations made in the other sections (Vendor Lists, Stacks etc) to create the template you require. In other words, in this section you can compile configurations made in the other sections to create the required template.
To add a new template: -
Click on the Add Template button
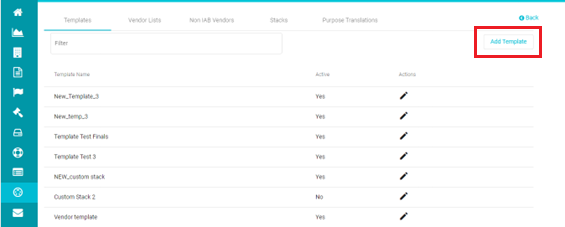
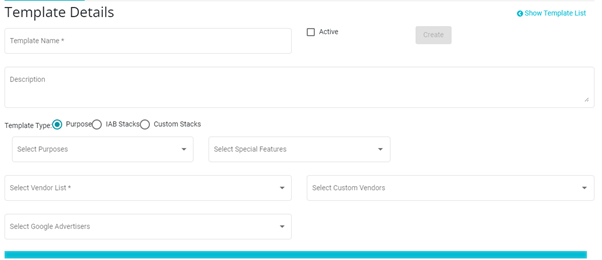
The template configuration screen will open
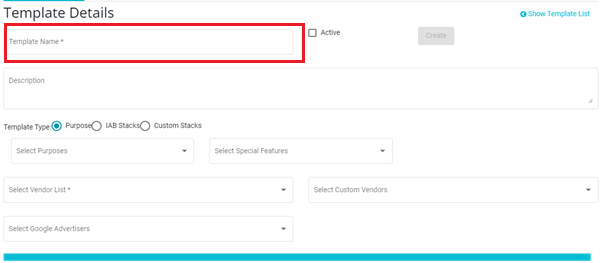
Type in the template name of your choice
Next, you can add a description for your template
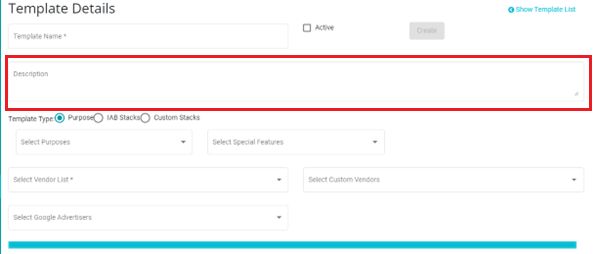
Next, select the Template type.
IAB specifies that the cookie banner should display the purposes of collection and special features. These purposes and special features are defined and provided by IAB.
IAB defines a purpose as "*one of the defined purposes for processing of data, including users' personal data, by participants in the Framework that are defined in the Policies or the Specifications for which Vendors declare a Legal Basis in the GVL and for which the user is given choice, i.e. to consent or to object depending on the Legal Basis for the processing, by a CMP.
Examples of purposes are:
Store and/or access information on a device
Create profiles for personalized advertising
Measure advertising performance etc.
IAM defines special feature as one of the features of processing personal data used by participants in the Framework that are defined in the Policies or the Specifications used in pursuit of one or several Purposes for which the user is given the choice to opt-in separately from the choice afforded regarding the Purposes which they support.
An example of a special features is:
- Use precise geolocation data
There are different template types to choose from. The first option is the Purpose Template. Choosing this template will display only the purposes and special features on the cookie banner.
- When you click on the Purpose Template type, two drop down menu's will be displayed.
- From the Select Purposes drop-down menu, select the purposes, as provided by IAB, for processing data. Theses purposes will be displayed on the cookie banner
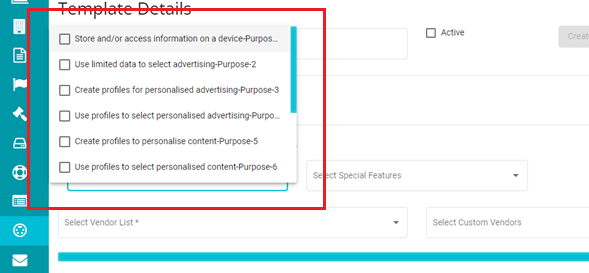
An example of Purposes displayed on the cookie banner is show below
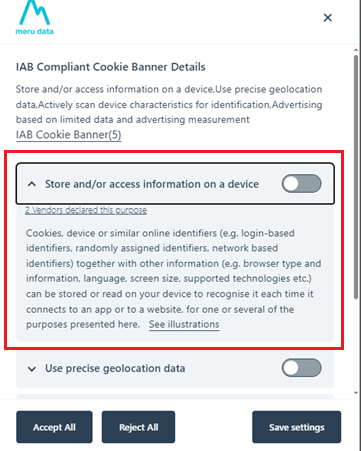
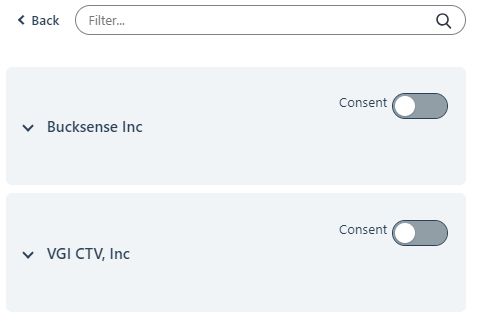
Here, users can view the list of Vendors that declare this purpose (collect data for this purpose).
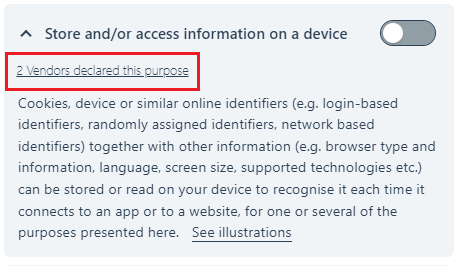
This list of declared Vendors is provided by IAB based on the purpose selected and the applicable vendors selected. In the example below, after clicking the 2 Vendors declared this purpose option, the user can view the two vendors that declare the purpose Store and/or access information on a device
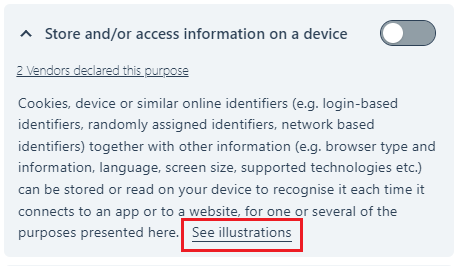
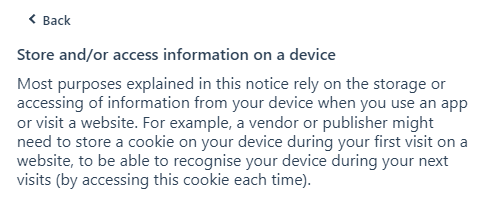
Users can also choose to see further information, with examples, of this purpose by clicking on the See Illustrations option
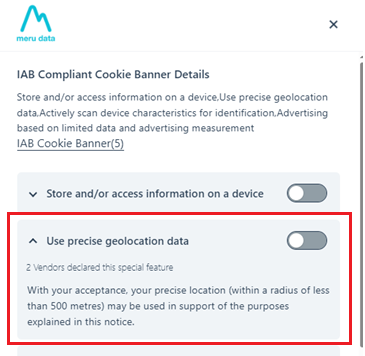
- Next, from the Select Special Features drop-down menu, select the applicable features of processing personal data. These special features will be displayed on the cookie banner.

An example of special features displayed on the cookie banner is shown below:
The next is template type is the IAB Stacks Template. A stack is a combination of purposes and special features. It is defined by IAB as one of the combinations of Purposes and/or Special Features of processing personal data used by participants in the Framework that may be used to substitute or supplement more granular Purpose and/or Special Feature descriptions in the Initial Layer of a UI.
IAB themselves provides Stacks which can be seen in the Stacks section.
- Once IAB Stacks is selected as the Template Type, an additional drop-down menu appears; Select IAB Stacks
- From this drop-down menu select the predefined Stacks to be displayed on the cookie banner.
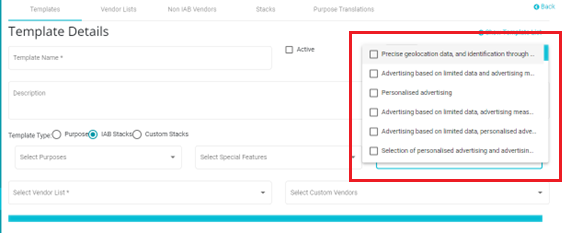
Note: Each purpose can only be displayed once on the cookie banner. This means that once a Stack has been selected, other Stacks which have purposes that overlap with the selected stack will become unavailable, i.e., they cannot be selected as displayed in the example below:
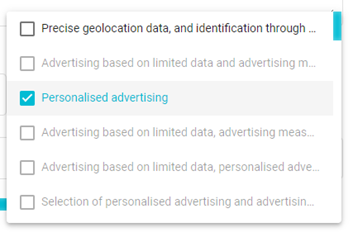
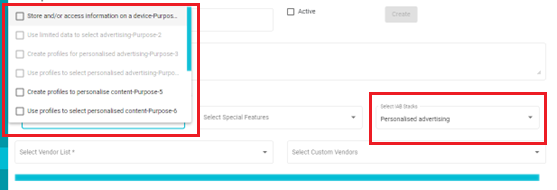
Note: Since each purpose can only be displayed one time on the cookie banner, once a Stack has been selected, purposes that come under the selected Stack, cannot be selected again on the purposes drop-down menu as displayed in the example below:
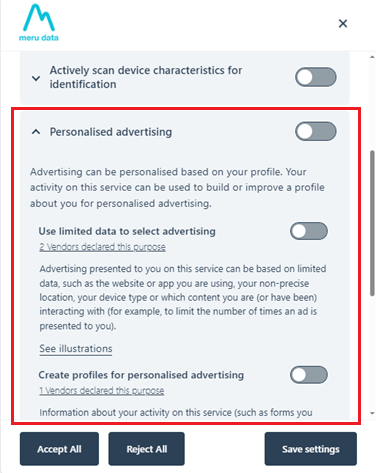
An example of the Stack displayed on the cookie banner is shown below
The last type is the Custom Stack Template type.
- On clicking this template type, all previous drop-down menus will disappear, and a new drop-down menu will appear; Select Custom Stacks

- From this menu, select any of the custom stacks that you configured in the Stacks section. A custom stack is a combination of purposes and special features that you have configured, i.e., not provided by IAB.
Next, from the Select Vendor List drop-down menu, choose vendor list of your choice to be displayed on the cookie banner.
This drop-down menu displays the list of vendors that are compliant with IAB. IAB themselves provides this list. Applicable vendors from IABs list can then be added to lists that you configure. These lists can be configured in the Vendor Lists section. Any active list configured in the Vendor Lists section will be displayed on this drop-down menu

The Vendors list (IAB Compliant, non IAB Compliant and Google Advertisers) can be accessed by clicking on the corresponding button on the banner. Steps to configure the Vendors list button name are shown in the following section of this guide.
An example of the Vendors list on the Cookie Banner is shown below:
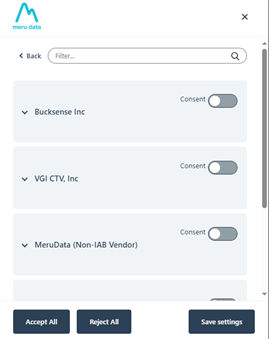
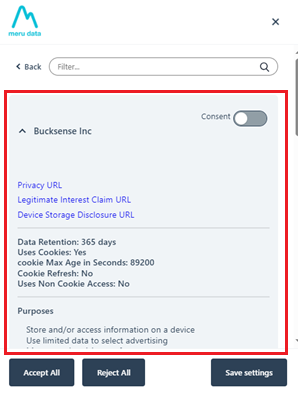
Here users can click on any of the vendors to view their details
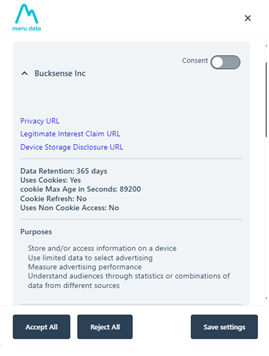
Here the user can see the following details about the vendor. These details have been provided by IAB.
Data Retention: For how long the vendor will store the data collected from the user
Uses cookies: Whether the vendor uses cookie storage (session or otherwise)
Cookie Max Age in seconds: For how long the cookie is stored in the user's browser
Cookie Refresh: Whether the vendor cookie will refresh once the cookie max age is reached. In other words, whether the consent preferences will be shown again once the cookie max age is reached.
Uses Non Cookie Access: Whether the vendor uses non-cookie storage and access to information already stored on a user's device.
Here the user can also see the purposes for collection, special purposes, features, special features and data declarations of that vendor.
Next, from the Select Custom Vendors drop-down menu, choose custom vendor list of your choice to be displayed on the cookie banner.
These lists are configured in the Non-IAB Vendors section and are comprised of applicable vendors that are not compliant with IAB.
Non-IAB Vendors will be displayed on the same Vendors list on the Cookie Banner
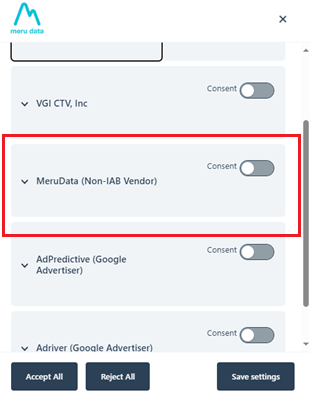
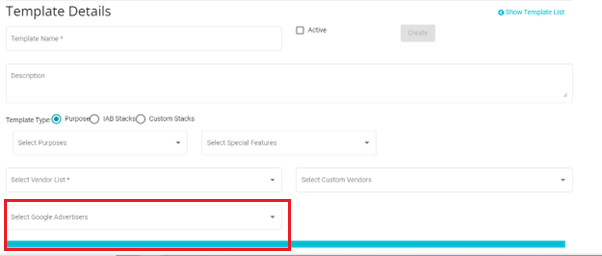
Next, from the drop-down menu, select the applicable Google Advertisers.
This is a list of Google Ads approved Advertisers or those Advertisers registered with Google Ads. From this list, select those advertisers who have placed their cookies on your website.
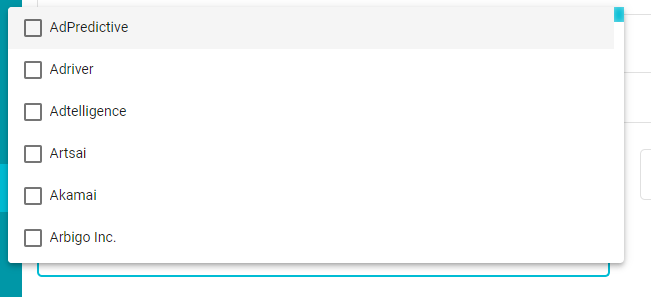
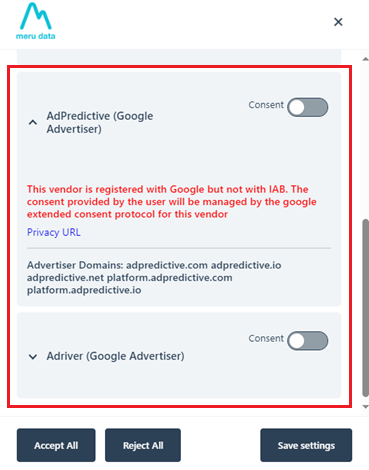
Google Advertisers will be displayed on the same Vendors list on the Cookie Banner
Once all the fields have been populated, click on the Create button
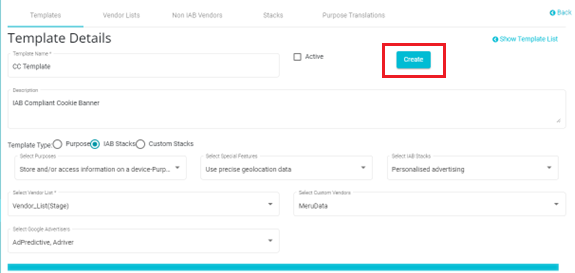
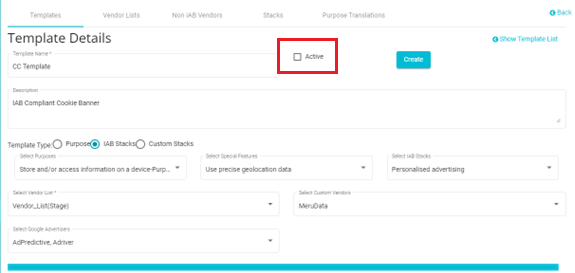
Once the template has been created, it needs to be activated for it to be published. To activate the template, check the Active box
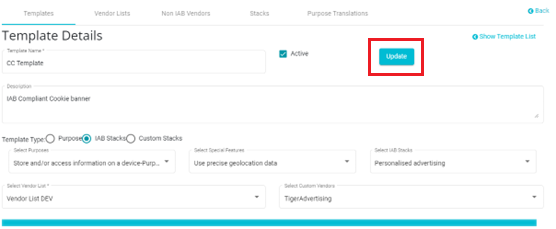
To edit an existing template, click on the edit button corresponding to that template

Once the edits have been made, click on the Update button to save the changes
Based on the above template configuration, the cookie banner will look like this:
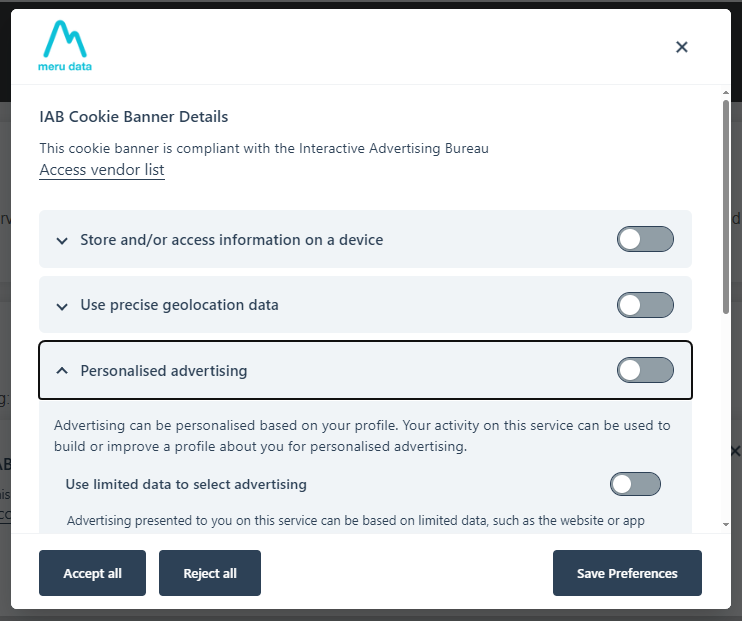
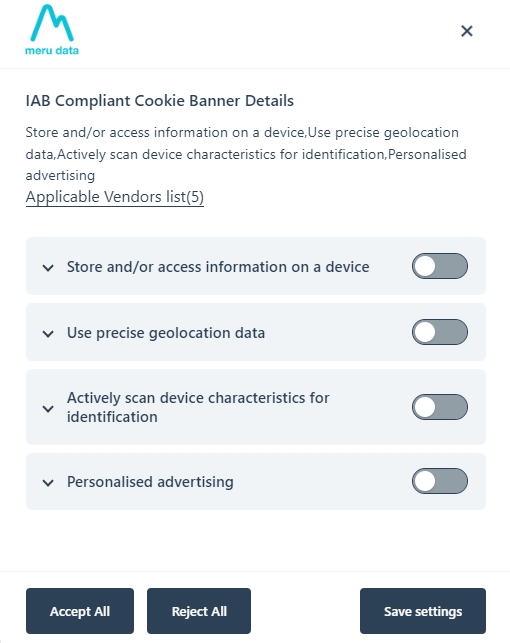
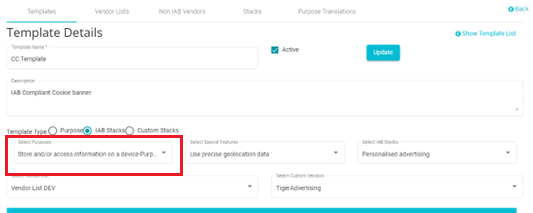
- Here, Store and/or access information on a device is a purpose selected in addition to the selected Stack.
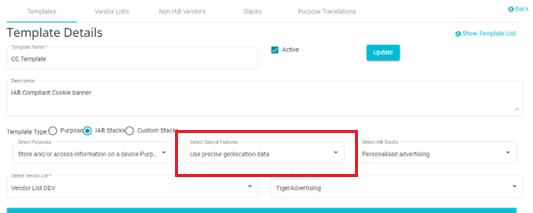
- Use precise geolocation is the Special Feature selected
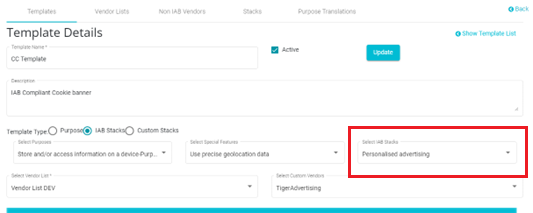
- And Personalized Advertising is the Stack selected
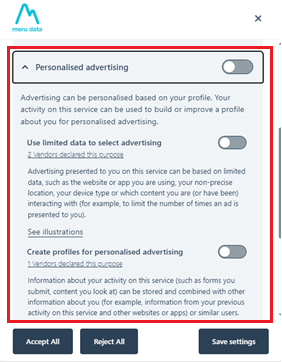
- On clicking on Personalized Advertising on the cookie banner, the purposes that fall under the stack will be displayed
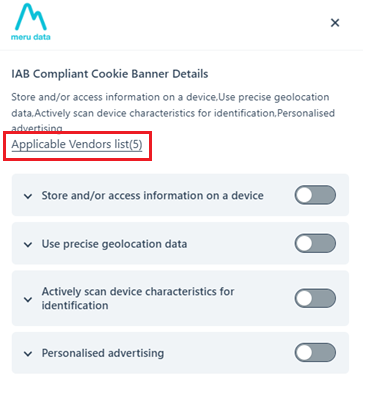
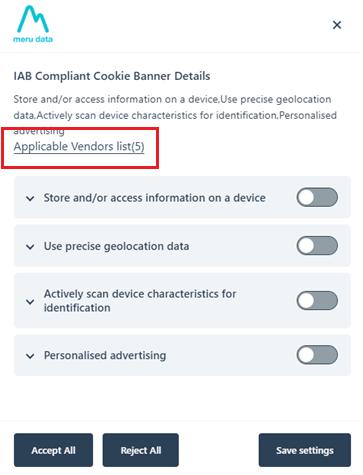
- To view the vendor lists (IAB compliant, non-compliant and Google Advertisers) click on the Applicable Vendors list button.
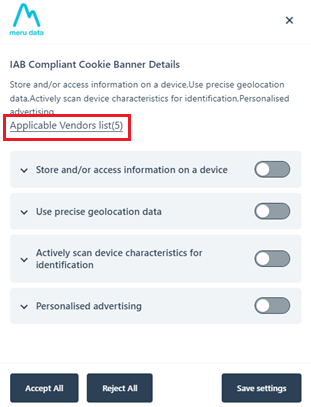
Note: This button can be edited. For example, you can choose to title this button "Show Vendor" list, etc. This button can be configured on the main Cookie Manager page under the Consent Modal.

- Once you click on this button, the IAB compliant vendors, non-compliant vendors and Google Advertisers list will be displayed
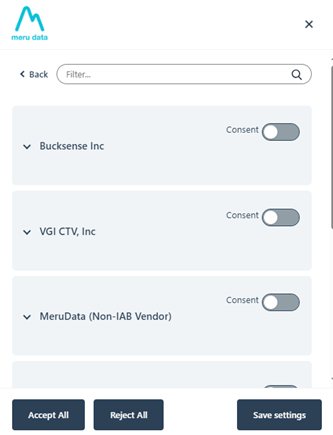
- Click on any of the Vendors to view its details
Now we move to the next section of the IAB configuration.
Vendor Lists

IAB mandates that all third parties who process users' data are listed on the cookie banner. Users can then choose to accept or reject their cookies. However, in some cases, third parties can collect certain data because of the legitimate interest clause. IAB provides a list of all vendors that are compliant with them. IAB's list of vendors is available here and from that list, applicable vendors can be added to your list depending on your requirements such as the geolocation of the website. This configured list will then be displayed on the cookie banner. An example of this is shown below
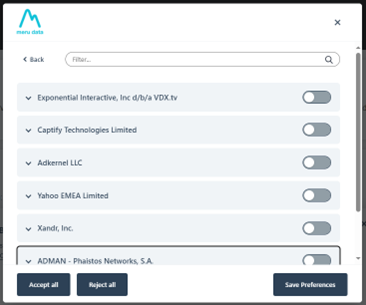
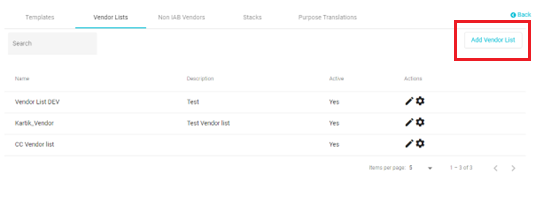
On the Vendor Lists page, all vendor lists created by you will be displayed

To create a new list:
Click on the Add Vendor List button
Here you will be able to add the List Name and a description for it

Once the two fields have been filled in, click on the Create button
Check the Active box if this list is to be used. Inactivated vendor lists will not appear while configuring templates and hence cannot be added to cookie banners.
Once the new list has been created. It will appear on the Vendor List page. From here the applicable IAB vendors can be added to the list.
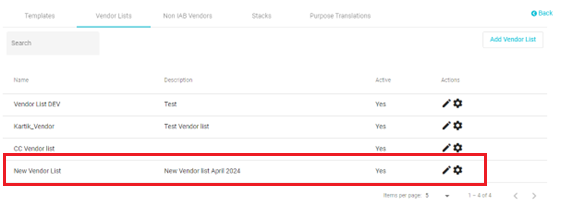
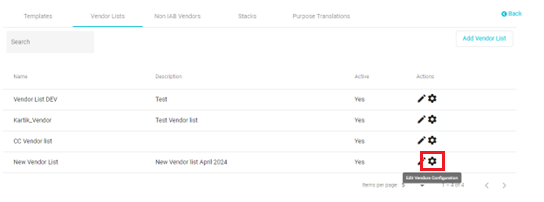
Click on the Edit Vendors Configuration button corresponding to your list
The Edit Vendors configuration page will open. This page displays the list of all IAB compliant vendors as provided by the Bureau.
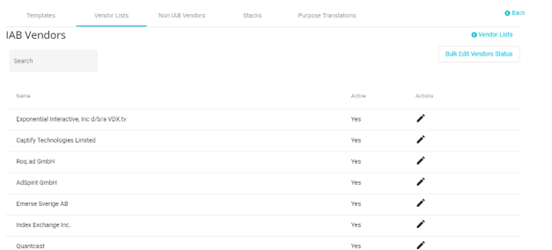
This list gets automatically updated every week to ensure it remains current with IAB. Vendors removed by IAB will be reflected here in this list.
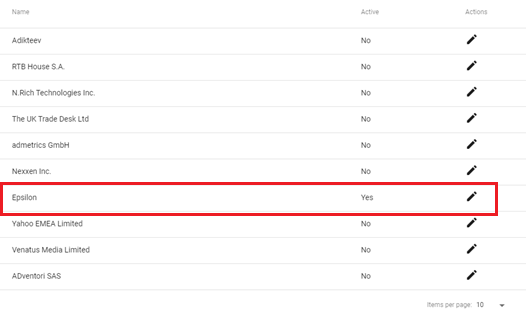
To add one of these vendors to your list, they must be Active. Inactive vendors will not be added to your list.
In the example below, only the vendor Epsilon has been activated and so only this vendor will be added to your vendor list
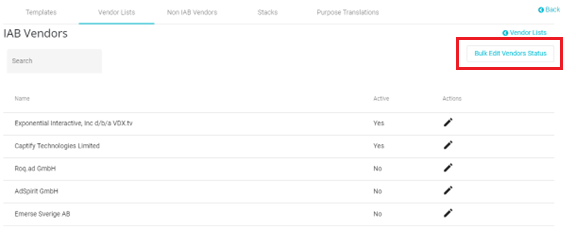
To activate or deactivate multiple vendors together, click on the Bulk Edit Vendors Status button
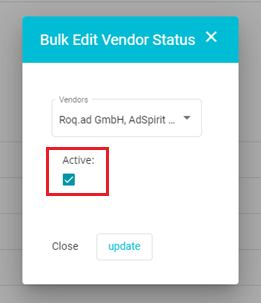
The bulk edit pop-up box will appear.
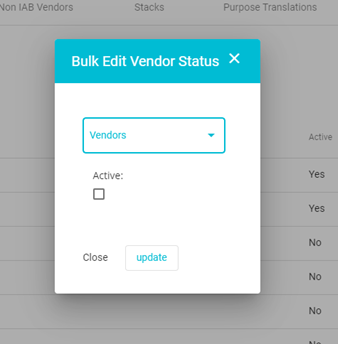
From the Vendors drop down on this box select those vendors whose status you want to update
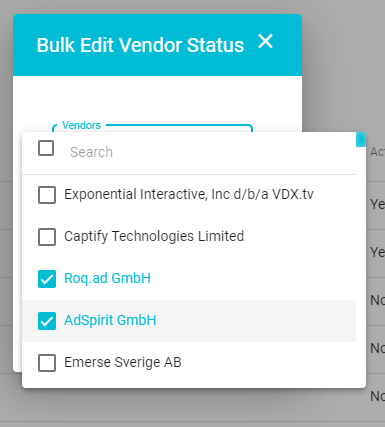
Once the selections have been made, check the Activate box
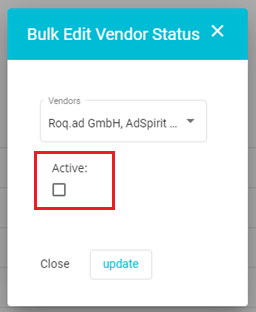
Alternatively, to inactivate active vendors, select those active vendors from the drop-down and leave the box unchecked
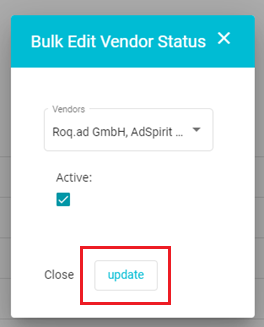
Once the selections have been made, click on the update button
The status of the vendors will change according to your selection
To active a vendor individually, click on the edit button corresponding to it
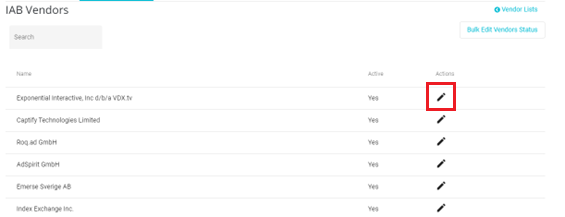
Here, the details of the selected vendor will be displayed. These details have been provided by IAB and cannot be edited. However, some purposes can be removed from the cookie banner and some purposes can be displayed under Legitimate Interests.
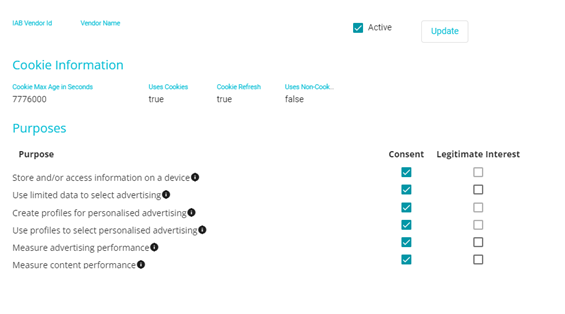
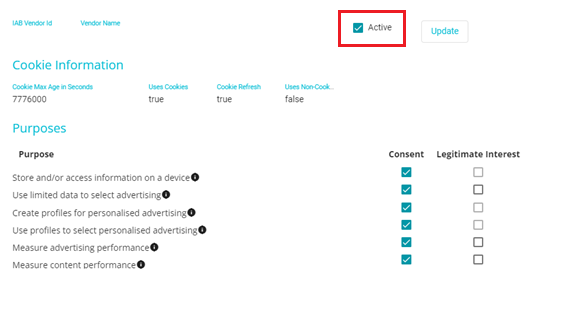
To activate the vendor so that it can be added to your list, check the Active box on this screen
On this page, you can also select what vendor data processing purposes are displayed on the cookie banner so that the users can make informed consent choices. The different purposes including those falling under Legitimate Interest will be specified so that the user can understand why the vendor is processing data. Further information about the vendor is also provided in this section of banner for the user's benefit.
If the consent box is checked here, then that purpose will be displayed on the banner under the vendor's name.
If the box remains unchecked, then that purpose will not be displayed on the cookie banner. Further, data will not be processed for this purpose by the vendor if the box is unchecked.
Only some purposes are applicable for Legitimate Interest (only the Legitimate Interest checkboxes for some purposes that are applicable can be checked).
If you check the legitimate interest box, then that purpose will be displayed under Legitimate Interest on the cookie banner. However, in this case, even if the user denies consent, some amount of data is processed.
Consider the example below,
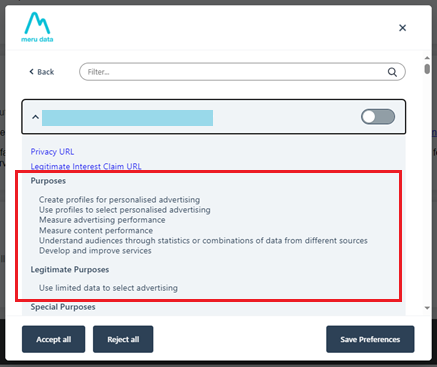
Store and/or access information on a device has been unchecked and hence will be appear on the banner
The Legitimate Interest checkbox for Use limited data to select advertising is checked.

Accordingly,
Store and/or access information on a device will not be displayed on the cookie banner and data will not be processed for this purpose.
Use limited data to select advertising will be displayed under Legitimate Purposes on the banner.
Both can be seen in the image below
Once the required vendors have been activated, they will be added to your vendor list. In such a way, multiple IAB compliant vendors lists can be created. Depending on the geolocation of the users, different lists will appear on the cookie banner as applicable.
Non IAB Vendors
Your website may include third parties/vendors, who are not compliant with IAB, who process users' data. IAB mandates that a list of these vendors is also displayed on the cookie banner. Configuring the non IAB vendor list can be done in this section

To add a new vendor:
Click on the Add Vendor button

The vendor configuration page will open
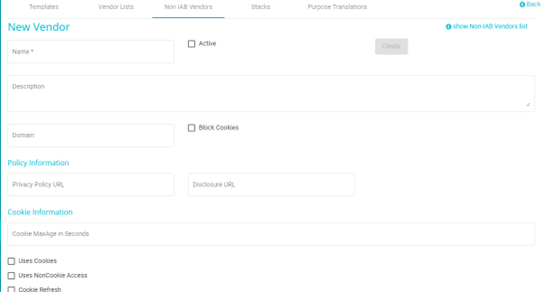
Here you can add the details of the vendor like their name, a link to their privacy policy, whether the vendor uses cookie storage, whether the vendor uses non-cookie storage and accesses information already stored on the user's device, whether the vendor refreshes cookies after the cookie max age has been reached, and so forth.
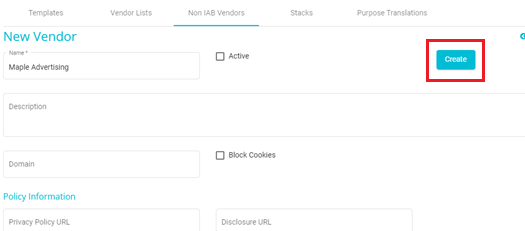
Once all the details have been filled in, click on the Create button
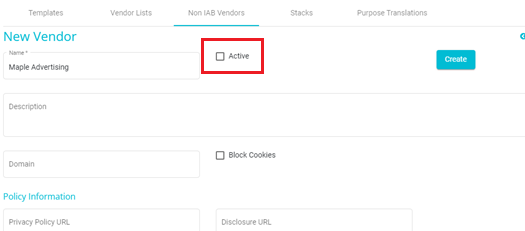
Check the Active box as only active vendors can be added to cookie banner templates
The newly created vendor will be added to the Non IAB vendors list

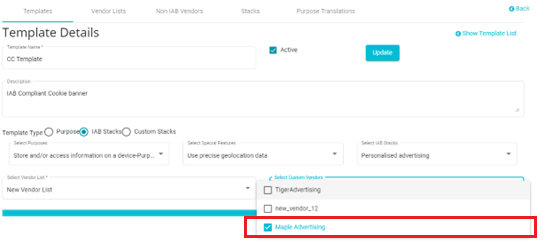
If activated, this new vendor can be seen on the Select Custom Vendors drop-down on the template configuration page
Stacks
IAB provides the ability to group purposes and special features and display them as a 'Stack'.
Stack means one of the combinations of Purposes and/or Special Features of processing personal data used by participants in the Framework that may be used to substitute or supplement more granular Purpose and/or Special Feature descriptions in the Initial Layer of a UI.
In the Stacks section you will the list of Stacks provided by IAB as well as custom stacks created by you if any
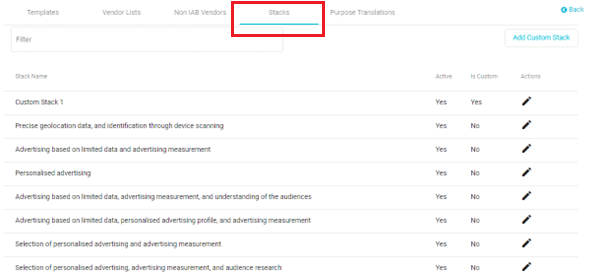
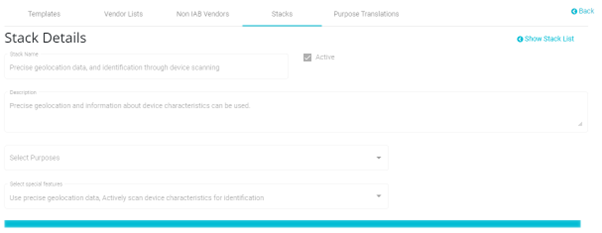
Stacks provided by IAB cannot be edited. On clicking on the Edit button against any stack, the Stack detail page will open. Here you can view the Stack details but cannot edit them
However, you can add customized stacks. To add a custom stack:
Click on the Add Custom Stack button
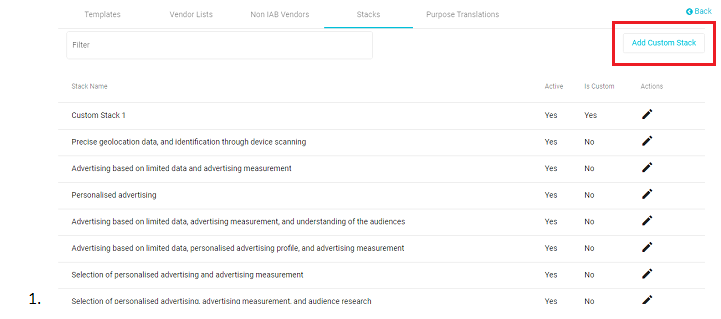
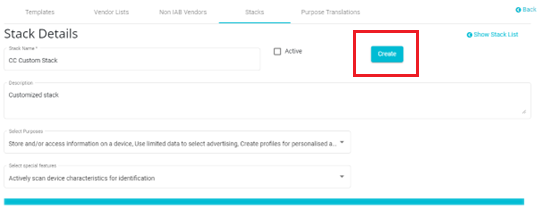
The Stack Details configuration page will open
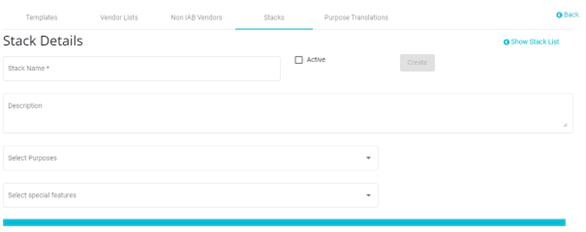
Here you can add the following details
Stack Name: Define a title for your custom stack
Description: Add a description for your stack
Select Purposes: From the drop-down, select the applicable purposes for data processing
Select Special Features: From the drop-down, select the applicable special features
Once the details have been added, check the Active checkbox so that this stack can be selected when creating a template
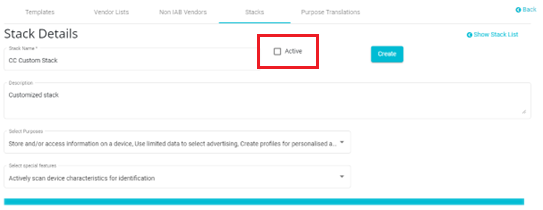
Click the Create button to save the Stack
Purpose Translations
IAB provides the ability to have the Purposes translated to the user's language. Depending on the geolocation of the user and the default language selected on their browser, the Purposes will be translated to the user's browser language. This happens if the user's browser language has been added to the language list in Purpose Translations section and if the cookie banner is configured for the geolocation.
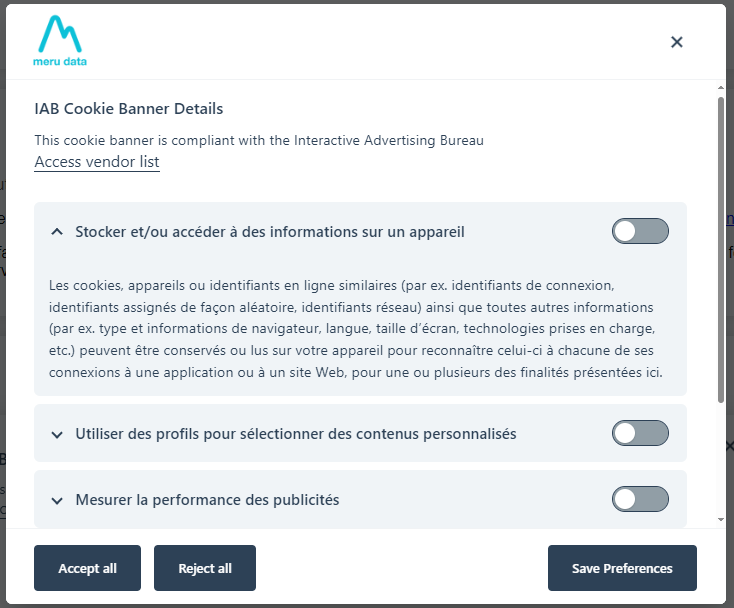
For example, if the cookie banner has been configured for France, and the user is currently in France, and the user's browser language is French, and French is included in the language list on the Purpose Translations page, then the purposes on the cookie banner will automatically be translated to French. This is seen in the image below
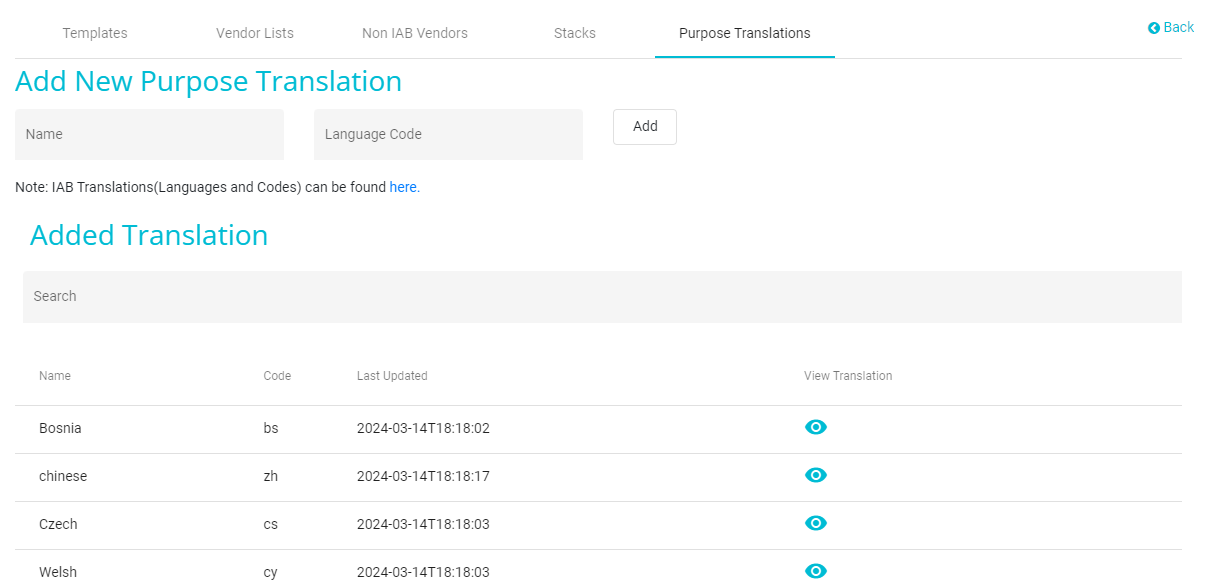
In the Purpose Translations section, the list of added languages can be found. The languages on this list have been added from the languages provided by IAB.
To add more languages:
Click on the IAB Translations (Languages and Codes) link
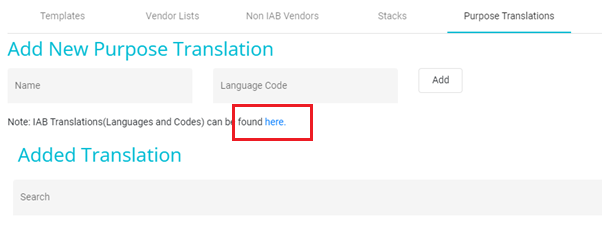
You will be redirected to IAB's list of translations page
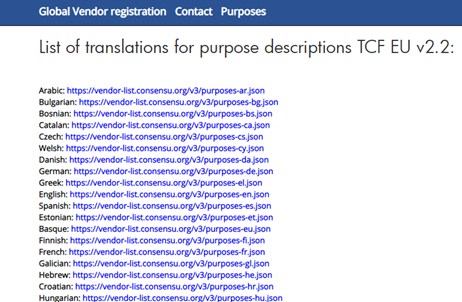
From here you can obtain the language name and language code
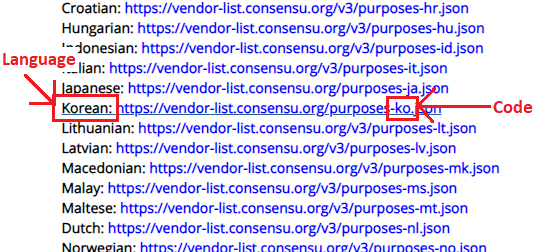
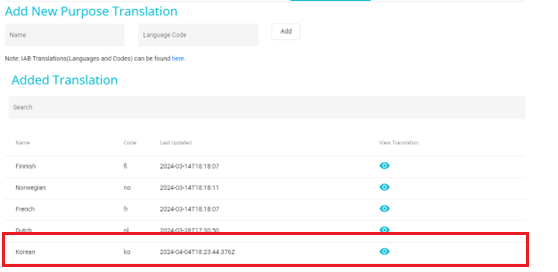
Back on the Purpose Translations page, you can enter in the language name and the language code in their respective fields


Click on the Add Button

The newly added language will now be visible on the languages list
Now that the configurations have been made and the templates have been created in the IAB Configuration section,
The appropriate IAB template will have to be selected,
The needed locations will have to be added and
The required titles to direct users to the IAB sections will have to be defined.
All this can be done on the main Cookie Manager page.
To select the IAB template:
Click on General on the main Cookie Manager page
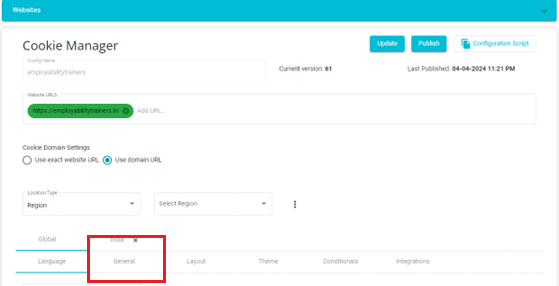
In the General Configuration Section, check the IAB Compliant checkbox

Next, select the geolocation that the IAB compliant banner will be applicable to. In other words, the IAB compliant section of the cookie banner will only be visible to users from the selected geolocation/country.
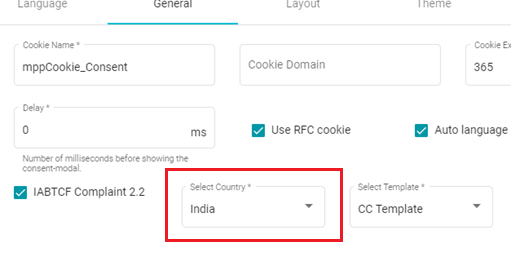
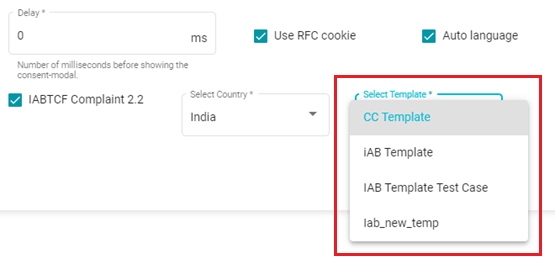
Finally, from the drop-down menu, select the required IAB template for the selected geolocation
Now, since the applicable location for the IAB compliant section has been selected, ensure that the same location is also selected for the overall cookie banner. This is because the IAB compliant section is a part of the overall cookie banner. So, if the IAB compliant section is applicable to one location, then the entire cookie banner will also have to be applicable to that location.
To select the location to which the entire cookie banner will be applicable, follow these steps (this has been covered in the first section of the guide):
Select the location from the Location Type drop-down
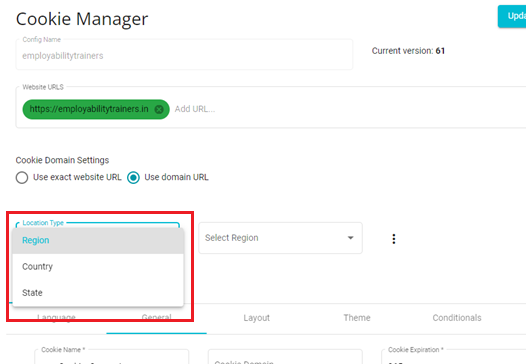
Here there are 3 options. Depending on the selection made here, you will then have to select the name of Country/Region/State of their choice.
This choice is made based on the location of end-users/website visitors using the website. If the primary customer base is in, for example, the state of California, then you will create a cookie consent configuration for end-users from California.
Different configurations are made for end-users from different locations to cater to the different laws and requirements of various locations.
Press on
and click Add New Location to create cookie configurations for multiple locations
In this manner, you can create different cookie configurations catering to end-users from different locations around the globe.
If Region is selected here, then, from the drop-down menu that appears, the user will have to select the specific region, as shown in the example below

If State is selected under Location type, then you will have to select the State as per their requirements
Note: If user has created multiple configurations for different locations, such as, for example, for Europe, for United States and for Texas, as shown below.
Then, a hierarchy is followed to select from among these configurations, which will be displayed to the end-user depending on their location.
If, for example, the end-user is visiting the website from Ohio, then it is checked whether there is an existing configuration for the State, here, Ohio. In this case, say there isn't a configuration for Ohio. Next, it is checked whether there is an existing configuration for the country. In this case, there is an existing configuration for the United States and hence that cookie consent configuration is provided to the end-user.
If there was no configuration on a Country level, then a Region level configuration is searched for. If there is no configuration on a Region level, then the default configuration - Global is provided to the consumer. The Global configuration can be customized.
Finally, you need to define the appropriate IAB titles on the overall cookie banner. This is done on the Consent Modal section present on the main Cookie Manager page.
To add the necessary titles:
Go to the Consent Modal section on the main Cookie Manager page
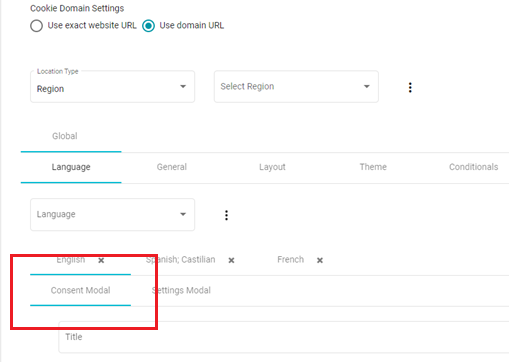
Scroll down to the bottom of the Consent Modal section to find the IAB
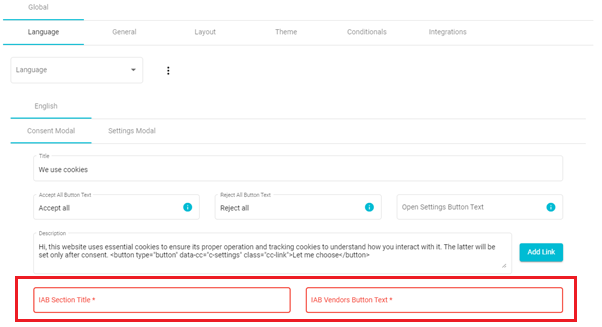
Here you can define the IAB section title
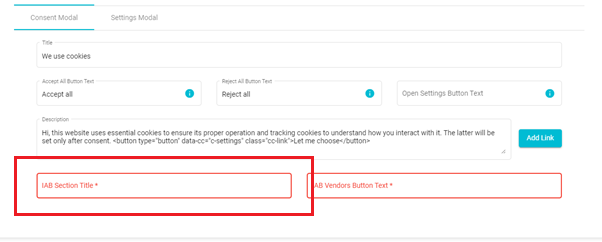
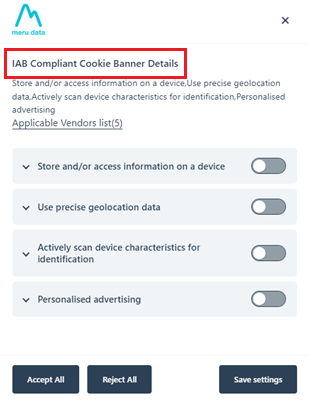
This is the title for the IAB section of the banner. An example is given below:
Next, you can define the title of the Vendor List button
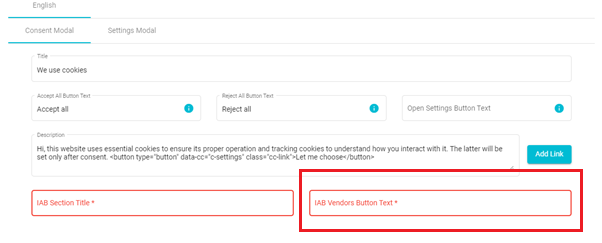
This button directs users to the vendor list that was added to the selected template. An example is given below:
Scanning a Cookie Configuration:
You can scan a particular website to gain insights into the cookies present on that website.
From the list of existing Cookie configurations, select the configuration whose website you want to scan. Click on the three-dot menu corresponding to that configuration.
From the menu that appears, click on Scan and Autoblock.
The Cookie Scanning page will open with the tabs - Scan, Results and Autoblocker
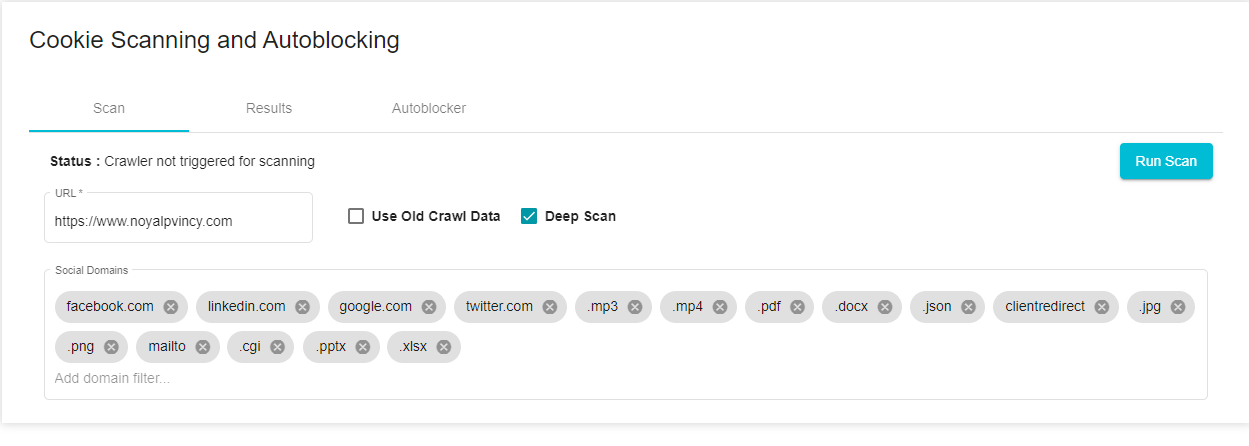
On the Scan tab, the following features are available:
Status: The scan status of the configuration will be displayed here.
Not Triggered for scanning: The Run Scan button has not been clicked yet.
Crawl in Progress: The scan is in progress
Parse in Progress: The scan is in its final stages
Completed: The scan is completed
Failed: The scan failed
URL: The URL/s provided during configuration. If multiple URLs have been provided, then the same will be visible here.
Use Old Crawl Data: On checking this box, the scan will be conducted on the information gathered from previously triggered scans.
In the case of new cookies being added to domains of a configuration that has already been scanned previously, click on Use Old Crawl Data to conduct a scan on top of the previously conducted scan to obtain information on the newly added cookies.
If this option is disabled, the scan will be conducted from scratch.
Deep Scan: Select deep scan to scan the cookies of links placed within the websites of the configuration. For example, if the website being scanned has links to other URLs placed on it, the deep scan will scan the additional links as well to provide information on the cookies present on those URLs.
In this example, the links to 2 other websites are present on the URL being scanned, hence subdomain 1 and subdomain 2 will also be scanned for cookies.
Social Domains: These are the URLs which will be left out of the scan. URLs can be added or removed from the field as required.
Run Scan: The scan takes around 24hrs to run. 2 Scans can run at a time. Scans to be run will be queued and picked up once 1 of the 2 scans currently being run get completed.
Results tab:
Here you can view the list of cookies found by the crawler on the website in a tabular form.
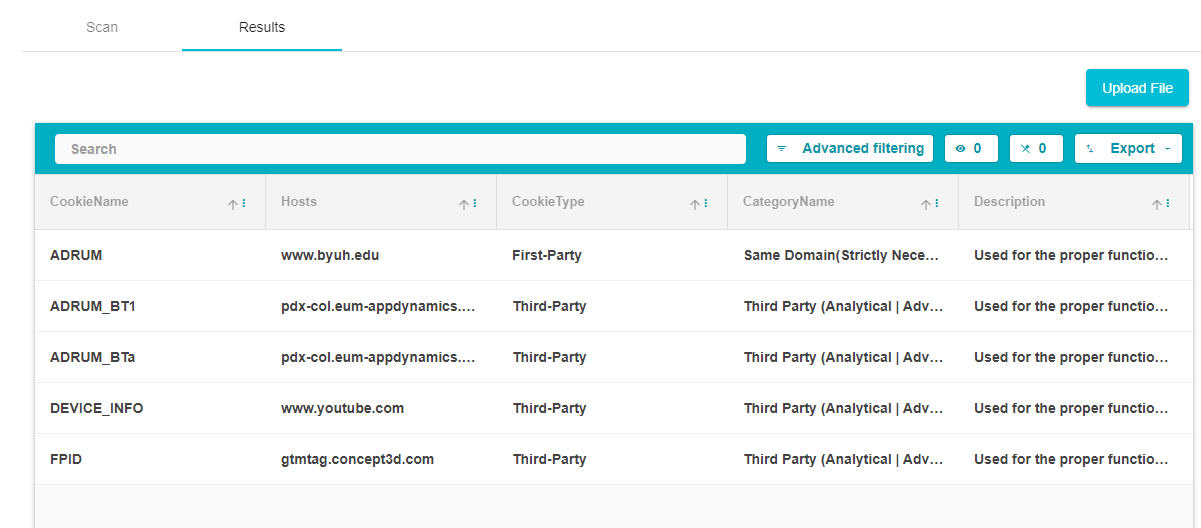
- To reclassify the cookies, you can export the data, reclassify it on an excel sheet and upload the reclassified data here.
Autoblocker Tab:
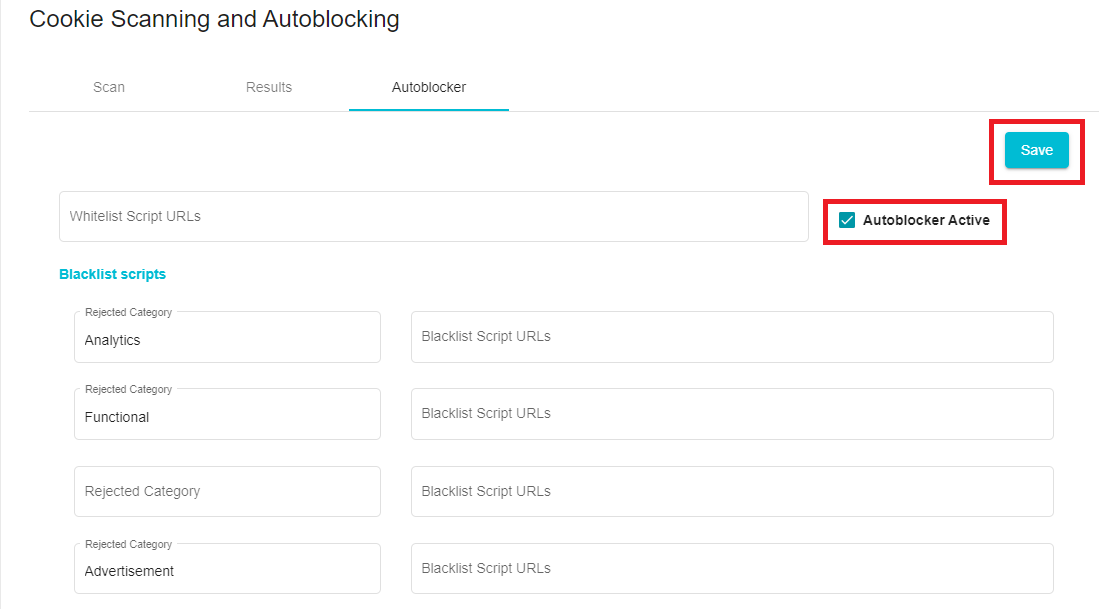
Here you can directly block categories of cookies from hosts of your choice. However, it is important to note that the Autoblocker function can only be applied to third-party cookies, not first party cookies.
You can also Whitelist certain hosts, meaning no matter what conditions are placed, the cookies of those hosts will be collected.
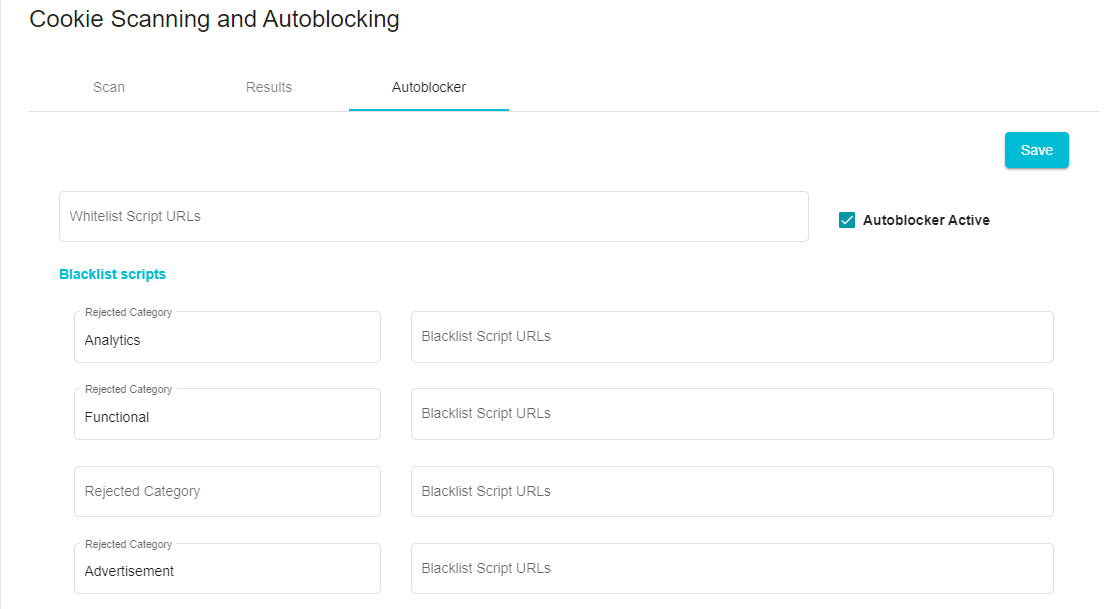
To Autoblock cookies, follow these steps:
From the Results Tab (list of all cookies found on the website, both first and third party cookies) select the hosts you want blacklisted.
Enter the selected URLs against the cookie categories you want blocked. If you place a URL against the Analytics Cookies fields, then all the analytics cookies from that URL will be blocked.
However, unless that URL is placed against other cookie categories, those cookies will continue being collected. In other words, if the URL is placed against the Analytics Cookies fields, then even though all the analytics cookies from that URL will be blocked, the functional and advertisement cookies from that URL will continue being collected.
On the other hand, to ensure that, no matter what, all the cookies are collected from a URL, enter the URL on the Whitelist Script URLs field.
Once the Autoblocker configuration is complete, click on Autoblocker Active, to activate the settings and then click on Save
